
Sailing the Blue Skies since 2001.

Tactics: Super Smash Bros. Brawl Assist Trophies
While I am nowhere near what could be considered an expert player of Brawl, I still get immense enjoyment out of the game and its awesome battlegrounds. This feature highlights the game's new assist trophies. I'll cover them generally, then focus on their particular talents and offer advice how best to use them to your advantage, whether you summoned them or not.
There are spoilers in this article, so if you don't want to see secrets, don't proceed.
Assist Trophies
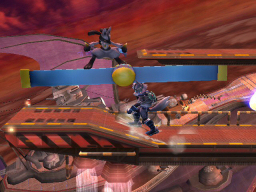
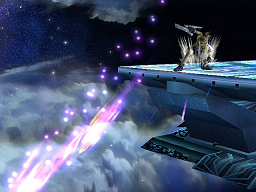
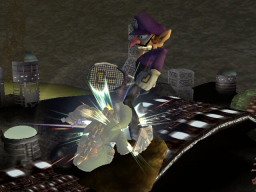
Andross (Star Fox, SNES)
Andross, much like his original SNES appearance, spits tiles at the arena. Once it reaches a certain point, it can strike any of the players who did not summon Andross. The damage is moderate, but it can K.O. opponents who have high enough damage. This lasts for three barrages, which takes about 20 - 30 seconds.
Andross is particularly nasty in stages where he slips in behind the background. This happens in Warioware, Inc. and Shadow Moses, for example. You'll hear a blare when he begins to let loose tiles, but their exact location is unclear until they cut through the background.
If you summon Andross, take advantage of his ability to strike multiple targets. His tiles range the whole playfield, and outside of slipping out onto the boundary edge of a stage that offers that luxury, there isn't really a safe place to stand. Watch where your opponents roam and try to knock them into the tiles as they approach. Or, if someone gets volleyed and isn't K.O.'ed, deliver juggling air strikes for extra damage.
If you are against Andross, try to keep an eye on where the tiles float to and either roll out of the way or run around to try to avoid them. If you are on a stage with an edge to stand on near a K.O. boundary, do so with caution. Juggling your poor adversaries after being struck with tiles is also a solid option, as long as another tile is not on the way to hit you.
Devil (Devil World, NES)
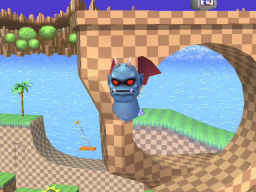
Devil appears innocent enough at first. He's almost kind of cute, even...in a creepy sort of way. But, he'll quickly show you why he's called Devil, though...
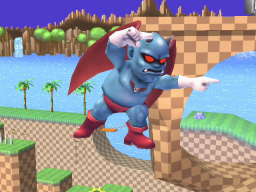
Devil's talent is to manipulate the K.O. boundary. He does so by pointing...in a somewhat disturbing dance routine. What this does is force the camera to shift, heading in the direction that he points. He tends to dance in five different directions for about 20 - 30 seconds before vanishing.
When Devil appears, anyone can be screwed over by him, so it's irrelevant who summoned him. Do your best to take advantage of the shift in the boundary, striking opponents towards the new K.O. zone. Try not to be too close to an edge, because he can quickly switch gears and potentially knock you out of the ring.
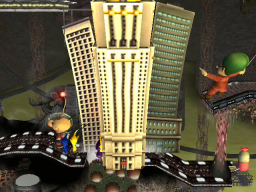
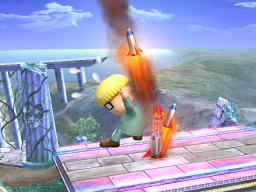
Dr. Wright (Sim City, SNES)
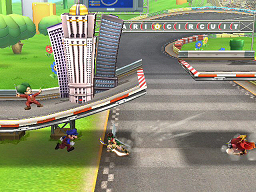
The helpful advisor from Sim City is a bit of a surprise guest to Brawl, considering he's a homage to Will Wright, the creator of Sim City. And in proper tribute, Dr. Wright's attack comes in the form of building skyscrapers! This attack does a ton of damage and has some high K.O. potential. However, Dr. Wright tends to build his architecture in the direction he originally was facing, has a short range, and features a bit of wind-up, so it's fairly easy to avoid.
When you have summoned Dr. Wright, your best chance to deliver his massive damage payload is to knock people into the attack as it's about to appear. The buildings only do damage as they pop up, so once they are full size, that's it. Dr. Wright mutters a bit and points down as he's preparing the construction, and a fanfare plays as it's going up. This bit of windup is about 3 seconds long. It's not a lot of time to plan anything too fancy, but you may get in a lucky strike that connects with the buildings.
Dodging this attack is pretty easy - you see Dr. Wright, you get as far away from him as you can. Its attack power is extremely high, and will send your fellow foes flying off in a hurry if they get caught in it, so trying to perform a follow-up will be close to impossible. You could quite easily catch an opponent off-guard with your own power moves as they scurry away from Sim Tower (would that be an appropriate name for it?), so consider that a viable option.
A final note - If Dr. Wright is on the edge when he is summoned, he may build his Sim Tower on the platform next to him, like so:
This could cause confusion to your foes...but since assist trophies are quite random, you'll have to get the luck of the draw for this to happen.
Excitebike (Excitebike, NES)
Excitebikers are fairly straightforward. A bevy of them will appear from their summoning point, driving around on the stage. They may turn and go the other direction occasionally, but usually they will go straight off an edge. Their damage is very low, but they tend to swarm together, which can cause juggling or, if things work out, can knock your fellow fighters off of the edge!
Taking advantage of the Excitebikes is a bit difficult. They can be leapt over, which does open up some air attack opportunities, depending on how well your foe is distracted. If you get fortunate, you'll be able to capitalize on someone who's been knocked off of the edge by them. They tend to knock foes sideways, so get ready to perform Down + A attacks to spike them into the pit. If you are on a stage with no edges, try to send them out of the boundaries with a solid air attack, depending on your character's best option.
If the Excitebikes are coming for you, try to leap out of the way or get to a higher platform. You can use them to your advantage if another player gets battered by them, spiking them into oblivion after being juggled off the edge. Excitebikes tend to drop straight down when they fall, so this is a fairly safe option for K.O.'s. In fact, it may work out better than summoning them yourself!
Hammer Brother (New Super Mario Bros., DS)
Hammer Brothers are a Mario staple, one of my favorite baddies from that universe, and a decent Brawl assist. When they appear, they will begin slinging out hammers, jumping once in a while. This lasts for about 10 - 15 seconds, and they tend to throw several hammers in that time. The hammers do adequate damage, but they aren't K.O.-level attacks by any means.
Hammer Brothers are probably best used as a distraction. Their hammers cover a decent range, so your opponent will probably be focusing on getting away from them. Try to sneak up quickly and give them a surprise attack, with a focus of putting them back into the Hammer Brother's attack range. Since the hammers are not going to knock your opponents very far, you can try to juggle unfortunate opponents after they get clobbered.
If a Hammer Brother is summoned against you, there's two safe places to be - far away or very close. The Hammer Brother usually does not throw hammers right next to him, so being close to him isn't a bad idea. You may get struck on a release of a hammer if you're on right on top of him, though, so keep that in mind. Far away may be a better option if the stage allows, but be aware of the opponent who summoned him.
Helirin
Helirin is one of the more problematic assist trophies. His appearance can quickly shift the pace of a match, despite his short summon time of 5 - 10 seconds. He is essentially an unpassable platform that rotates. You can stand on him, but not leap or fall through him. When he's vertical, your attacks and projectiles will not pass through him (unless you have a "long" A attack).
Helirin is not a major benefit or concern for the summoner or his/her opponents, so a generalized strategy is to just try to use him to your advantage. Since he can't be passed through, he can because a handy tool for K.O.'s via bouncing foes off of him. He may also become a vital return option if he's over a pit. He doesn't stick around too long, though, so don't bet the farm on him for these strategies.
Jeff (Earthbound, SNES)
Jeff can be a very dangerous assist. After a bit of wind-up, he'll fire off several mini bottle rockets across the stage, that have a mild homing capability to your opponents. However, the best part of Jeff's assault is the final rocket, which packs a little more punch. It's possible that Jeff will fire off two volleys of explosives, too. His K.O. potential is moderate, especially on foes who are in the air.
Jeff makes the summoner's life easy - the rockets cover a vast majority of the stage, making it quite difficult to escape from. The homing capability is of a generalized "where they were when fired" philosophy, so speedy opponents may be able to weave through the barrage without much of a threat. However, you can focus on the fighters that are dodging the blasts, and even send them into a rocket for an extra chunk of damage and a potential K.O. If Jeff is summoned underneath certain types of platforms (Skyworld, for example), his blasts may destroy themselves on the platforms before getting anywhere, so keep that in mind.
Jeff can be a pain to avoid. His rockets cover a wide space, and are trying to strike you. Use your fellow opponents as shields if possible, and try dodging or rolling to try to slip around them. Jeff is a great distraction - try to pummel your foes with punishing Smash attacks while they attempt to get away from the missiles.
Jill (Drill Dozer, GBA)
I was so happy to see Jill in Brawl. Her game is unique and she makes for a great assist. When Jill appears, she has a moment of wind-up where she unites her drill, then proceeds to wander around the stage after opponents, punishing them with her drill. She can jump around, so trying to use platforming as a method of escape is only a mild deterrent to her chasing you. Her damage output is decent, but she usually isn't a K.O. threat (unless you or your foes have a high damage percentage). She does have a tendency of falling off the stage, prematurely ending her attack time.
Jill can be a handy assist to summon. As she punishes opponents, they get stuck in a repeated hit animation, leaving them open to extra punishment from the summoner. She also homes in on the closest foe, which is useful as well.
To avoid Jill, it helps to have speed. She isn't all that fast, so put distance between you and her as quickly as you can. Another good tactic is to knock opponents who didn't summon her between you and her - she targets whoever is closest to her, so use that knowledge to help you escape her attack. Lastly, she can plummet off of the stage, so you can try to bait her into doing so by stepping on moving platforms or other obstacles that will become unreachable to her. If you're on a stage that rearranges itself (Warioware or Frigate Orpheon, for example), this is a good strategy.
Kat & Ana (Warioware, Inc., GBA)

The kindergarten ninjas from Warioware are the Assist Trophy equivalent of Pokemon Latias and Latios; they fly around in various X patterns across the stage, striking anyone in their way for fairly strong damage. They tend to cross where they were summoned OR where the summoner stands (I need to study this a bit further to be sure). They have a high K.O. potential, and are extremely difficult to avoid. They do not have the "wind" effect that their Pokemon dopplegangers feature, but they are still dangerous.
Kat and Ana are quick enough to punish juggled opponents all by themselves. They're what I call "autopilot" assists, ones that do enough all by themselves without the summoner needing to do anything else to cause chaos. If you summon them, you can use the time they're slicing opponents to track down good items, or by placing yourself in a good position to fight opponents as they respawn (or, if they are lucky, not get K.O.'ed).
Kat and Ana are really hard to dodge. They come in vertically and horizontally with their strikes, so no place is really safe. Try to avoid their spawn point, as they tend to cross their X in that area. Rolling or air dodges may deter them, but timing is key. If you get through relatively unscathed, you can try to pummel opponents who weren't K.O.'ed, but that may be tricky, since the summoner is probably doing the same thing.
Knuckle Joe (Kirby Super Star, SNES)
Knuckle Joe is a frighteningly cute assist for someone who is so threatening. If he appears, he will unleash Vulcan Jabs onto the nearest opponent. After a few Jab barrages, he'll punish them with a Rising Break or a Smash Punch, which will more than likely send them packing towards the K.O. boundary in a hurry.
Knuckle Joe is a great assist for a summoner to get. His Vulcan Jabs will pretty much nullify a foe until it's over, and you can either add in some more damage or just let Joe go to town. Joe's range is moderate, and he'll leap around to target someone, so he's fairly mobile. Add in his high K.O. factor and you've got one of the scarier assists to summon.
Distance, as usual, is key to avoiding Knuckle Joe's Fighter techniques. If he appears, get far away. With some practice, you may be able to strike an opponent enroute to a K.O. from Joe's super moves. Outside of that, though, it's best to stay away and focus on fighters that are also leaving the area or the summoner, if he's away from Joe. You don't want to get caught in Joe's assault.
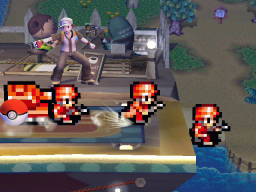
Lakitu & Spinies (Super Mario Bros., NES)
Lakitu in his NES sprite glory is one of the weaker assists in Brawl. He drops 3 - 5 Spinies onto the stage, which do little more than temporarily make the stage just a touch more dangerous than before. Spinies do weak damage in either egg or hatched form, and don't last long enough to be very effective as a trap or obstacle. On top of that, Lakitu can be stomped a la Super Mario Bros. and will drop to his doom before he can even attack! In short, you'll probably curse your luck if Lakitu is what you summoned.
The only major benefit the summoner receives from Lakitu is the fact that he can pass through the Spinies unhurt. Spinies are quite slow and easy to dodge, and Lakitu's low throw number doesn't make the situation very tense. If someone gets struck by an egg or Spiny, you can try to combo them with a follow-up attack, but that's about all you can do.
If Lakitu appears, you can try to stomp him. That removes the minimal threat he presents quickly, and also sets up another Assist Trophy to appear sooner (and hopefully in your favor!). If Lakitu gets up to his attack space and begins Spiny lobbing, just watch for the eggs and dodge accordingly. Spinies wander off the edge, are slow, and are fairly easy to see coming (they are bright red), so they should be considered an annoyance at best. Work around them.
Little Mac (Punch-Out!!, NES)
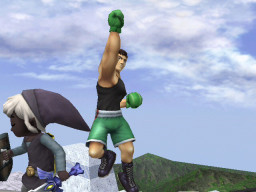
Nice to see Punch-Out!! finally get some recognition in the Smash Bros. series. Little Mac is a beast. His uppercut can equal a K.O. more often than not, and his jabs are nothing to snort at, either. He bops around the stage for 10 seconds or so, delivering damage to whoever is unfortunate enough to get caught up in his punches. He also jumps around, is quite quick, and his smaller stature gives him some stealth, so he's definitely one of the best assists in the game.
If you are the lucky summoner to bring Little Mac into the fray, it's like someone enabled Team mode. Mac will pummel foes quite well, and his uppercut (which tends to happen twice per summon) has huge potential to knock a foe out for a Star K.O. His dashes cover a ton of distance, and outside of leaping off the stage occasionally, Mac is awesome. You can focus on other foes as he goes to town on another without much fear.
Little Mac is a foe you will want to just stay away from. His uppercut is random (although he usually finishes his appearance with one) but lethal, and his standard jabs do a meaty amount of damage, too. Your best bet is to watch out for the summoner (they will be hunting down anyone Mac isn't beating to a pulp) and try to juggle foes lucky enough to merely get punched.
Lyn (Fire Emblem, GBA)
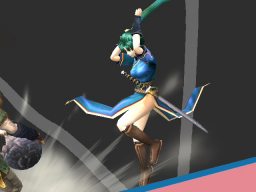
Lyn is such a cool character. I love her design and her awesome attack style, so I'm quite glad she was chosen to represent Fire Emblem's assist trophy. Lyn also happens to be one of the most dangerous in the game, one that should strike fear into anyone who did not summon her. When she appears, she'll crouch down and begin building up power, like so:
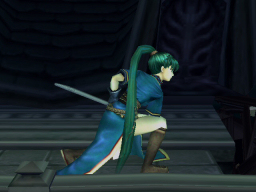
After a few seconds, she'll zoom towards the closest foe and deliver a Critical strike, one that will pretty much seal their fate. Lyn's range is farther than you'd expect it to be, but you can nullify her completely if everyone she could attack is outside of her range (which is EXTREMELY rare...I've only seen it happen once). Once her attack begins, there's practically no chance of avoiding it. She'll shatter through your shield, and timing a dodge or roll is really difficult. I imagine it could be done, but I expect it would be really hard to pull off.
The summoner's job once Lyn appears is to make sure she strikes someone. Just keep one foe near her, and Lyn will take care of the rest. Items, smashes, throws...whatever works.
If Lyn appears, you will want to make a quick escape to get as far as you can from her. The summoner will try to thwart these efforts, but find a way to get around them. Lyn will punish you if you don't. Her attack is extremely fast and will send foes flying, so don't worry too much about trying to swipe the K.O. Just be glad it wasn't you.
Metroid (Metroid, NES)
Metroids are perfect for assist trophies. I was really delighted to see them in the game. They function much like they do in Metroid - they latch onto a random foe, suck life away from them, and slows them down (as well as providing a funny jerky animation). They also cancel the ability to shield, a handy note to keep in mind. Metroids can be bopped around to try to send them after someone else, but they'll probably pry onto you instead. After three grapples, the Metroid will vanish.
Summoning a Metroid is a boon, because it manages to cause damage and disable shielding, allowing the summoner to add in a powerful attack onto the Metroid's life-drain. The Metroid's ability to latch three times is also an asset. Lastly, you can bop them around towards foes! Take advantage of them.
Metroids are difficult to avoid. They float around until someone gets close, then they make a beeline right to them. To get a Metroid off of you, shake the analog stick or try to bat them off with an upward strike. Do your best to keep an eye on it and to keep your foes closer to it than you are, and you should be fine.
Mr. Resetti (Animal Crossing, N64/GC)
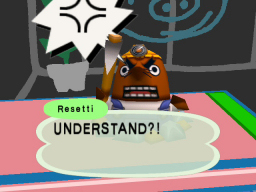
Mr. Resetti is perfect for the distraction role. His text bubble covers a large chunk of the playfield, and he will not shut up for at least a minute and a half. Clearly, he is not the assist you want to summon (although he is kind of funny). At least he doesn't give your opponents any slack, either...
On certain stages that change the stage's landscape, Resetti may drop off of the stage, ending his tirade early. This doesn't happen as often as I'm sure people would like, but it's about the only way to quiet him prematurely.
Nintendog (Nintendogs, DS)
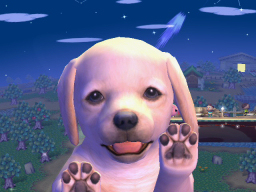
Nintendogs sure are cute! They serve a similar purpose as Mr. Resetti - providing a screen covering distraction. They last about 8 seconds, but cover up more of the screen than Resetti does. The best advice I have is to try to stay still during this time, but in Brawl, that rarely presents itself as an option...so just be wary and watch to see if you're falling off the side.
Saki Amamiya (Sin & Punishment, N64)
Saki is extremely versatile - he offers more options than any other assist in terms of what he can do. Along with that, he deals out a good amount of damage, and can potentially lead to K.O.'s. Saki has two main forms of attack - he fires blasts, like so:
Or he slashes at them with his Canon Sword. He moves around more than any other assist, and seems to have a solid grip on where he should be and what to attack to be most effective. He's fast and can leap around, too. He also lasts for about 15+ seconds, making him an excellent assist to summon.
Like Little Mac, if you summon Saki, it's like Team Mode was enabled. He fends for himself quite well. He lacks the near-always K.O. move Little Mac features, but he sticks around much longer and can attack from up-close or at a distance, which helps counteract that fact. Saki also manages to not fall off the side of the stage (I haven't noticed him doing so in my playtime), adding to his worth. If Saki fires off a succession of blasts your direction aimed at a nearby foe, try to combo off of them. If your opponents have high damage, Saki will finish them off with his sword swings, and will serve you well.
Since Saki can fight up-close or far away, your safety as an opponent to the summoner becomes limited. Saki is probably easier to deal with at a distance, since you can see the blasts coming (they are fast, though). Use your fellow opponents as cover and keep on the move. If you get the opportunity, try to snag one of your spiraling opponents with a quick attack as they careen past you, or capitalize on someone who failed to block or dodge Saki's blasts.
Samurai Goroh (F-Zero GX, GC)

I am glad Goroh made an appearance in Brawl (he was the very first assist trophy revealed, for that matter). His attack method is swinging around his sword in brutal, unpolished strokes. Goroh also sprints around the arena, although he is portly, so it's not quite as fast as you may expect. He doesn't stick around as long as others of his AT style, either. A fairly useful assist trophy, but not the best.
Goroh tends to send opponents away from him as he attacks, so you can't use him to combo like you can with Knuckle Joe. It's probably best for you to let Goroh do his thing as you try to capitalize on your foes trying to escape his fury.
Goroh may act in a similar manner compared to Saki, Little Mac and Knuckle Joe, but he's much more direct in his attacking than they are. By that, I mean that he is blinded by rage, and is not as clever as other AT's in their attack methods. He runs around slashing, then stops and slashes some more. Other AT's seem to have some sort of understanding with their attacking, but Goroh just wants to slash his heart out. He can jump, but he isn't the greatest jumper (see the portly comment earlier). To avoid him, watch where he's stampeding to and go the other way. Odds are good that he'll stay over in that area and disappear before he threatens you.
Stafy (Densentu no Stafy, GBA)
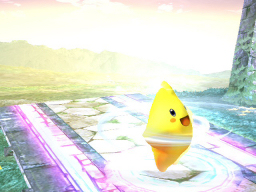
Stafy's very cute. A cute tune plays if he's summoned, and he'll waltz around and occasionally spin to deliver minor damage. He'll disappear or wander off the stage (or, even more likely, get hit off of the stage) without causing much of a disturbance to the players.
Out of the AT's that can move and attack, Stafy's the worst. His Spin causes a mere 3 - 6% damage (and I may be overdoing it), he's slow, and opponents can simply deck him to remove him from the arena. As cute as he is, Stafy's one of the worst AT's to summon in Brawl, and you won't be too pleased to see him pop up.
However, if you see someone else summon him, then you have little to worry about. Dodge him or simply attack him to remove him from play and cause another AT case to pop up in his place...and maybe get in your hands!
Tingle (Legend of Zelda: Wind Waker, GC)
Tingle is a bit of an odd duck. He can do four different varieties of "assisting":
1. He will do nothing but release a parade of balloons.
2. He will force the camera to follow around the summoner.
3. He will unleash a ton of hammers, of both variations. He may also sling out banana peels.
4. He will bestow a "curry" effect on everyone.
Since Tingle is so unpredictable, it's hard to offer a solid strategy. If he does #1, fight as you have been. #2 is like a Resetti/Nintendog distraction, but worse. You won't be able to see your character unless you're near/are the summoner. Stand very still if you don't see yourself and shield. If he tosses out hammers, grab one and hope it's real. If #4 is the result of his magic, then you'll just have to fight with a curry effect, which is quite entertaining. If anything, Tingle will spice up the match!
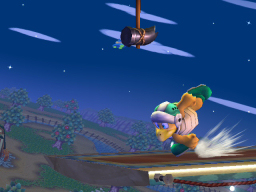
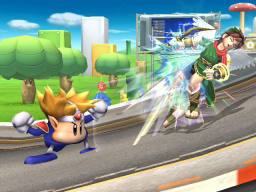
Waluigi (Mario Tennis, N64)
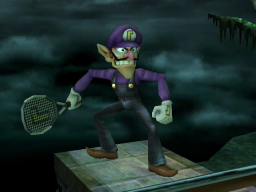
Waluigi is the best Mario assist in the game, and makes a solid case for being one of the better ones in general. He'll hunt down the nearest opponent and proceed to stomp them into the ground, like so:
After two or three stomp-fests, he'll pause for a second, then either smash the closest foe with his tennis racket or punt them; either will more than likely translate into a K.O. Note that if Waluigi is not around anyone for that pause, he will attack anyway and then vanish.
Waluigi tracks down foes quite well for his stomps, and will even pummel opponents in the air! If he catches someone on the ground, he'll bury them a la a pitfall. The summoner can take this opportunity to add in some more blows. Add in Waluigi's powerful final attacks and he makes a great "autopilot" assist.
If you see Mr. Tall & Lanky, get away! His stomps will cancel your ability to retaliate, bury you in the ground, and leave you open for additional punishment from him and his summoner. Waluigi isn't too fast, so if you have a speedy character, use their speed to keep away. Watch out for Waluigi when he pauses - this is when he's at his most dangerous!
Barbara (Diagasso Band Brothers!, DS)
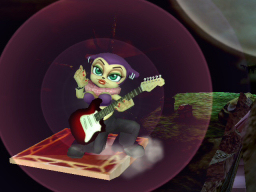
Barbara is a pretty cool character - shame she doesn't stick around for long in Brawl. She'll jam on her guitar five times, with each riff increasing the size of a damaging sound wave that surrounds her. The final strum will be the largest and most powerful, sending anyone struck by it a fair distance. She's got decent K.O. potential, but her range is really limited and her time on stage is quick; she'll be gone before you know it.
If you summon Barbara, hope that other foes were trying to reach the assist trophy before you and failed. Barbara starts attacking quickly, and will likely catch your enemies for the full brunt of her aural assault. If you are unfortunate enough to summon her when no one's nearby, she'll probably finish her jam by the time you hit someone towards her. She's onstage for the shortest amount of time of all the AT's in the game, so it's pretty much an All or Nothing situation.
If someone else summons Barbara and you're far away, you have little to fear. Just stay away from her and you'll have nothing to worry about.
Ray MK III (Custom Robo Arena, DS)
Ray MK III is a great assist. He sticks around for a long time, constantly barrages the stage with blasts from his laser pistol and pods at a wide range, and is hard to see because of his small size. The only downside he has is that his shots do not go through platforms. Another great example of an "autopilot" assist.
If you summon Ray, your opponents will be focusing on getting someplace undercover. Expose them into the fray with attacks, and keep them out in the open at any cost to maximize Ray's effectiveness. He doesn't have a huge K.O. potential, but he can dish out damage in a hurry.
If someone summons Ray, get undercover and do all you can to stay there. His range is wide, so using the edges as safety nets can be risky (especially if he sends pods your way), so stand under a platform and consider that your base - defend it!
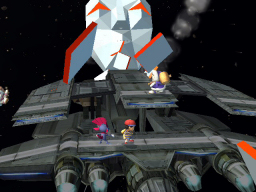
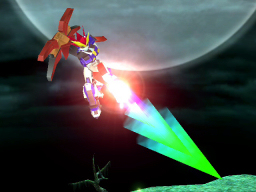
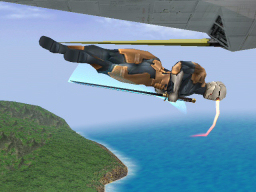
Gray Fox (Metal Gear Solid: The Twin Snakes, GC)
After a classic Metal Gear Solid quip ("I feel alive again!", for example), Gray Fox will dash around the stage, cutting your foes to ribbons with split-second strikes. His barrages are quick and punishing, and he will track foes down with quick precision. He can also jump multiple times, and I have not seen him plummet off of a stage yet. I consider Gray Fox the second best AT of the "Move & Attack" variety (Saki is first), and he's one of the best in Brawl.
As with Mac and Saki, Gray Fox is a great teammate. He may lack the projectiles Saki features or Mac's punishing uppercut, but his speed, agility and ferociousness are all topnotch. He will hunt down your opponents tenaciously, and you can let him shred them apart as you focus on adding in combo strikes or chasing down the other opponents trying to avoid him.
Gray Fox is HARD to avoid. He is fast, smart and will pursue you and your fellow foes down better than any other AT. There is a slim chance he'll get stuck in a place he has trouble getting out of (Great Fox's gun turret in Corneria, where this shot of him is from, for example), but all and all, Gray Fox is a beast, and you'll need to be cunning to get away from him. Use the stage to your advantage, and try to send your foes his way to save yourself.
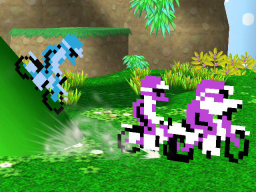
Orange Star Troops (Infantry & Tanks) (Advance Wars, GBA)
These brave troops act similar to Excitebikes - they're appear with a blare of a siren, and then march off the side of the stage. Both infantry and the M. Tanks will fire tiny rounds, giving them a bit more of an edge than the Excitebikes. Usually, 4 - 5 infantry and 2 tanks appear.
If you summon the Orange Star troops, consider my Excitebike AT advice:
Taking advantage of the Excitebikes is a bit difficult. They can be leapt over, which does open up some air attack opportunities, depending on how well your foe is distracted. If you get fortunate, you'll be able to capitalize on someone who's been knocked off of the edge by them. They tend to knock foes sideways, so get ready to perform Down + A attacks to spike them into the pit. If you are on a stage with no edges, try to send them out of the boundaries with a solid air attack, depending on your character's best option.
Outside of the number (they have fewer sprites than the Excitebike assist) and that they can shoot, they are pretty much the same.
When faced with the Orange Star battalion, stay off of the platform they appeared on and you shouldn't have any problems. Consider spiking opponents unfortunate enough to get caught up in them downwards if they get knocked off the ledge. However, unlike their Excitebike cousins, the OST fall in a diagonal slant, so keep that in mind.
Issac (Golden Sun, GBA)
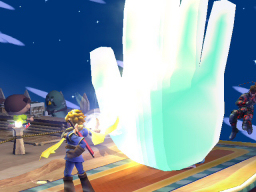
Out of the hidden assists, Issac is the most dangerous. Using his Golden Sun Psyenergy powers, he performs three "Move" attacks. These huge hands push any opponent caught in it off of the edge of the stage. This is a very difficult attack to get out of. It is also quite huge, making potential escapes all the more troublesome. Issac is also able to change directions from left to right, depending on where the majority of opponents are lurking.
If Issac appears as your summon, consider yourself very lucky indeed, because you should get some K.O.'s. Issac will force your opponents into defensive and/or evacuation mode, trying to get out of Issac's massive range. He's the epitome of the "autopilot" assists; he'll probably get more accomplished in his appearance than you will while he's on stage. Let him go to work, and get the foes that happen to be on Issac's opposite side down to his level, since he'll probably spin around and unleash "Move" that way next.
It is not a good thing when someone else summons Issac. It will really depend on the stage to determine the best course of action to try to avoid him. If Issac has a platform right above him, consider standing there perfectly matched up with him; his Psyenergy will probably miss you by a few inches. You may be able to roll through the giant hand, but it's a bit tricky. If the stage is tall enough, get up above or below his range; his "Move" will scrape the bottom of the stage, so being below him may be the safer bet.
Shadow the Hedgehog (Sonic Adventure 2, DC/GC)
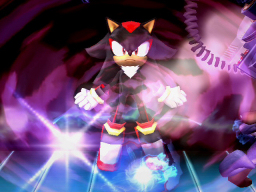
Shadow is very similar to a Stopwatch in your favor; he'll perform his patented move, "Chaos Control", which slows down all of the opponents of the summoner for 10 or so seconds. Pretty straightforward.
If you summon Shadow, take advantage of their loss of speed and pummel them with quick, powerful attacks that they can not block in time.
If you are the one slowed down by Shadow, act as you would if a stopwatch was grabbed by an opponent; try to roll, dodge or guard, and avoid using smash or long wind-up attacks until Shadow ceases.